Aspire separates publish (generate parameterized artifacts) from deploy (apply to an environment). With a tiny bit of code, you can hook into the publish pipeline, prompt for the target environment (dev/staging/prod), and stamp Docker image tags + .env accordingly—perfect for local packaging and CI pipelines.
Why this matters
Out-of-the-box, Aspire can publish for Docker, Kubernetes, and Azure. The aspire publish command generates portable, parameterized assets (e.g., Docker Compose + .env); aspire deploy then resolves parameters and applies changes—when the selected integration supports it. For Docker/Kubernetes, you typically publish and then deploy via your own tooling (Compose, kubectl, GitOps). Azure integrations (preview) add first-class deploy.
Supported targets (at a glance)
- Docker / Docker Compose → Publish ✅, Deploy ❌ (use generated Compose with your scripts).
- Kubernetes → Publish ✅, Deploy ❌ (apply with
kubectl/GitOps). - Azure Container Apps / App Service → Publish ✅, Deploy ✅ (Preview).
The workflow in practice
1. Generate artifacts
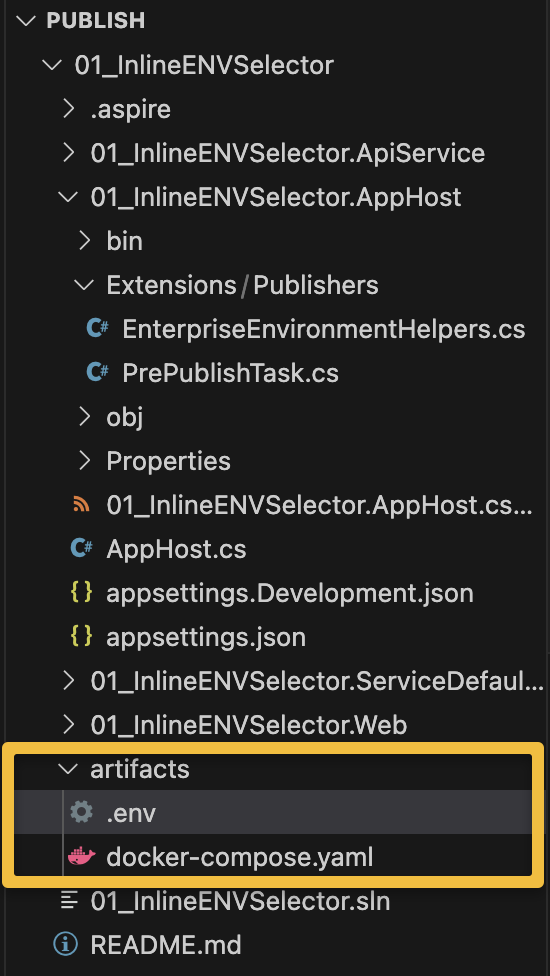
aspire publish -o artifacts/For Docker, you’ll get artifacts/docker-compose.yml plus a parameterized .env.
2. Run those artifacts (Docker example)
docker compose -f artifacts/docker-compose.yml up --buildProvide required variables (shell export/.env/CI variables) before you run.
3. Or use aspire deploy when the integration supports it (Azure preview).
What Microsoft documents (and what they don’t)
Microsoft’s overview explains publish vs. deploy, the support matrix, and that artifacts contain placeholders intentionally—values are resolved later. The extensibility story (custom callbacks/annotations) exists but is thin; you’ll often reach for PublishingCallbackAnnotation / DeployingCallbackAnnotation to inject your own steps. This post shows one concrete, production-useful example.
Scenario: interactive ENV selection + Docker image tagging during aspire publish
Goal
When we run aspire publish, we want to:
- Prompt for target environment (
dev,staging,prod). - Write that choice to
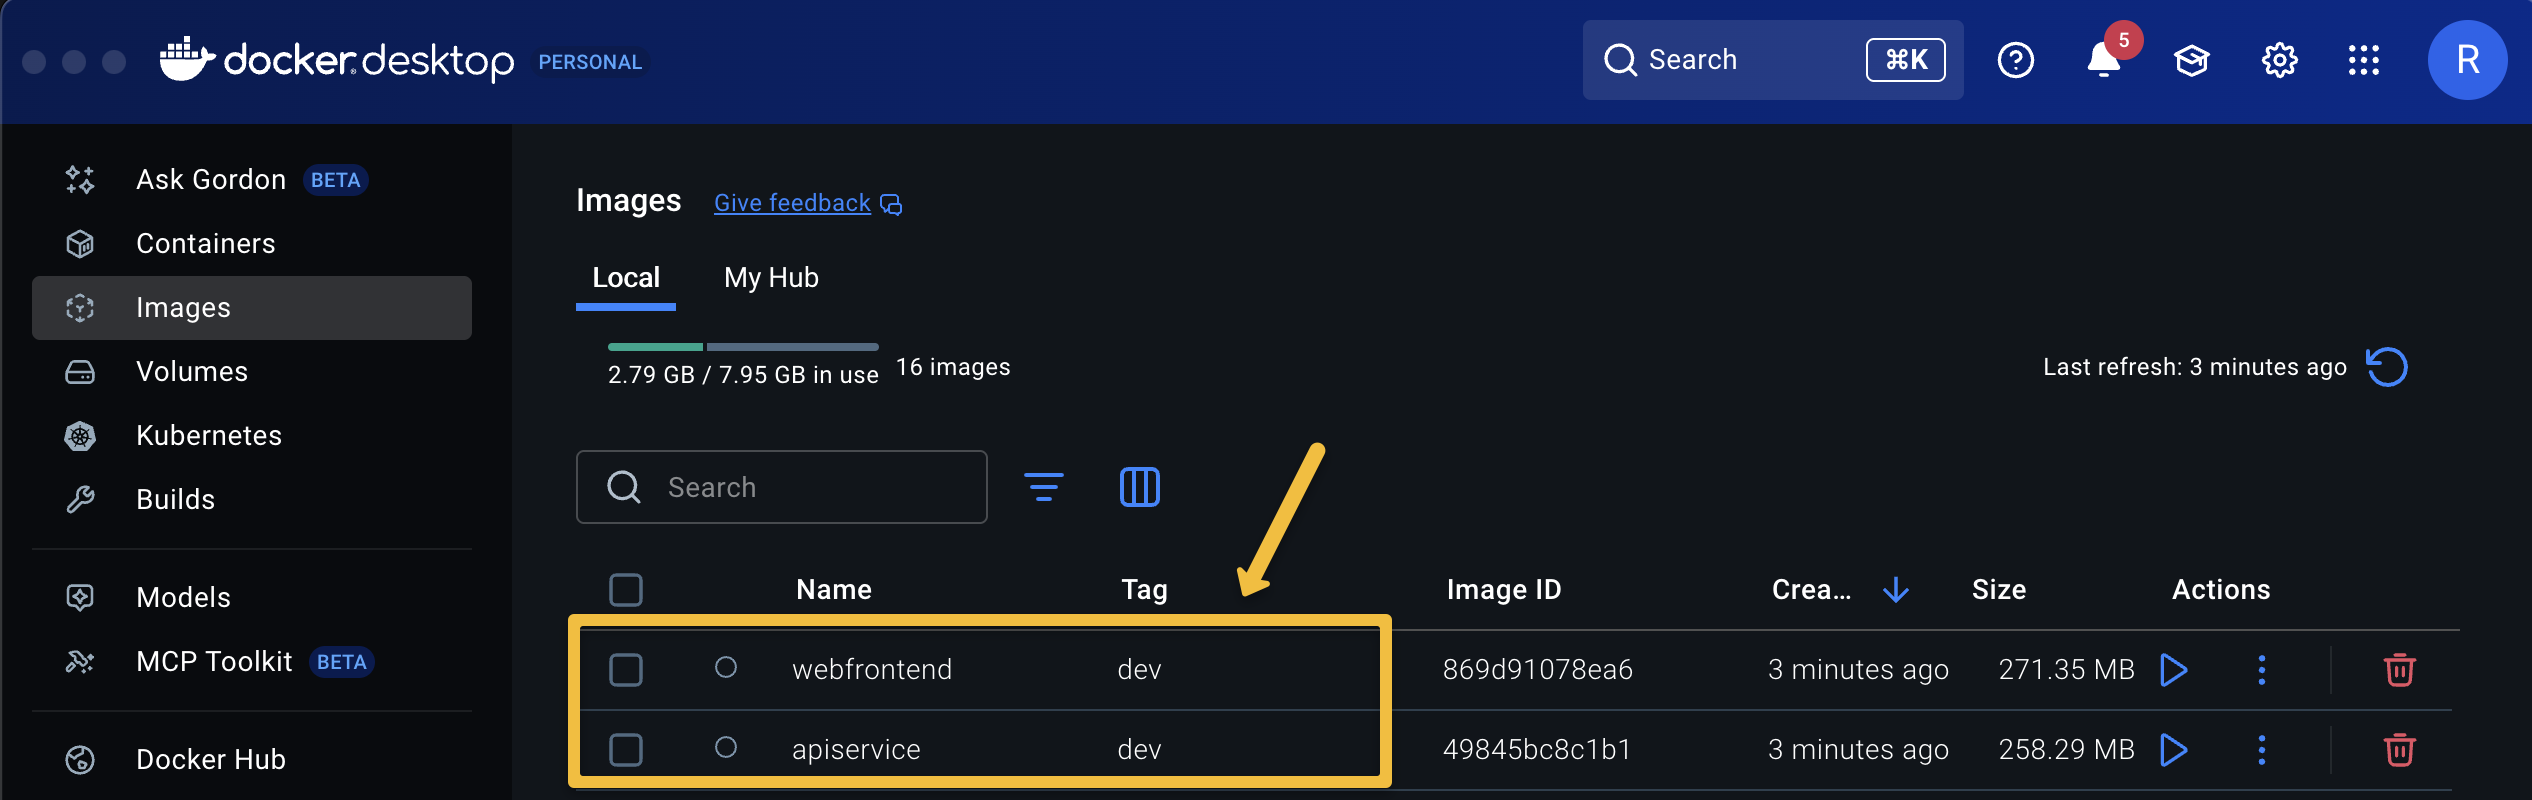
.env(e.g.,ENTERPRISE_ENV=Prod). - Tag Docker images with the env (e.g.,
apiservice:prod,webfrontend:prod). - Ensure Compose variables (image names, env flags) are set consistently.
Project setup
Start from the Aspire Starter template:
dotnet new aspire-starter --use-redis-cache --output 01_InlineENVSelectorAdd the Docker publishing integration:
dotnet add package Aspire.Hosting.Docker --version 9.5.2-preview.1.25522.3Because publishers are preview, silence preview warnings in your AppHost csproj:
<PropertyGroup>
  <NoWarn>ASPIREINTERACTION001;ASPIRECOMPUTE001;ASPIREPUBLISHERS001;</NoWarn>
</PropertyGroup>
Why Docker? Because Docker’s integration generates Compose + .env and builds images, but doesn’t implement aspire deploy—that’s by design. You’ll deploy with Compose (or your CI runner) using the artifacts.
The two small building blocks
Create Extensions/Publishers/PrePublishTask.cs:
public sealed class PrePublishTask(string name) : Resource(name) { }Create Extensions/Publishers/EnterpriseEnvironmentHelpers.cs:
public enum EnterpriseEnvironment { Dev, Staging, Prod }

public static class EnterpriseEnvironmentHelpers
{
    public const string MsBuildOrEnvName = "ASPIRE_TARGET_ENV";

    public static bool TryParse(string? raw, out EnterpriseEnvironment env)
    {
        env = EnterpriseEnvironment.Dev;
        if (string.IsNullOrWhiteSpace(raw)) return false;

        switch (raw.Trim().ToLowerInvariant())
        {
            case "dev":      env = EnterpriseEnvironment.Dev;     return true;
            case "staging":  env = EnterpriseEnvironment.Staging; return true;
            case "prod":
            case "production":
                             env = EnterpriseEnvironment.Prod;    return true;
            default:         return false;
        }
    }
}
Hooking into the publish pipeline (interactive prompt + tagging)
In your AppHost (e.g., Program.cs), before adding Docker Compose, inject a pre-publish callback:
using Aspire.Hosting.Publishing;
using Microsoft.Extensions.DependencyInjection;

// PRE step that runs BEFORE compose publisher
if (builder.ExecutionContext.IsPublishMode)
{
    builder.AddResource(new PrePublishTask("pre-publish"))
        .WithAnnotation(new PublishingCallbackAnnotation(async ctx =>
        {
            if (!ctx.ExecutionContext.IsPublishMode) return;

            var ct = ctx.CancellationToken;

            // 1) Resolve target environment: env var first, then interactive prompt
            EnterpriseEnvironment? selected = null;
            var fromVar = Environment.GetEnvironmentVariable(EnterpriseEnvironmentHelpers.MsBuildOrEnvName);
            if (EnterpriseEnvironmentHelpers.TryParse(fromVar, out var envFromVar))
                selected = envFromVar;

            if (selected is null)
            {
                var interactionService = ctx.Services.GetRequiredService<IInteractionService>();
                var envResult = await interactionService.PromptInputAsync(
                    title: "Environment Configuration",
                    message: "Please enter the target environment name:",
                    new InteractionInput
                    {
                        Name = "environmentName",
                        Label = "Environment Name",
                        InputType = InputType.Text,
                        Required = true,
                        Placeholder = "dev, staging, prod"
                    },
                    cancellationToken: ct);

                ct.ThrowIfCancellationRequested();

                if (!EnterpriseEnvironmentHelpers.TryParse(envResult.Data?.Value, out var envFromPrompt))
                    throw new InvalidOperationException($"Invalid environment selection: '{envResult.Data?.Value}'.");

                selected = envFromPrompt;
            }

            var valueRaw = selected!.Value.ToString();  // "Dev" | "Staging" | "Prod"
            var tag = valueRaw.ToLowerInvariant();      // "dev" | "staging" | "prod"

            // 2) Make the tag visible to container builds (MSBuild)
            //    This sets the ContainerImageTags property used by Aspire container builders.
            Environment.SetEnvironmentVariable("ContainerImageTags", tag, EnvironmentVariableTarget.Process);

            // Keep the original ENV around too
            Environment.SetEnvironmentVariable(EnterpriseEnvironmentHelpers.MsBuildOrEnvName, valueRaw, EnvironmentVariableTarget.Process);

            // 3) Prepare/patch .env with our ENV + image names (Compose will reference these)
            Directory.CreateDirectory(ctx.OutputPath);
            var dotEnvPath = Path.Combine(ctx.OutputPath, ".env");
            List<string> lines = File.Exists(dotEnvPath) ? File.ReadAllLines(dotEnvPath).ToList() : new();

            void Upsert(string key, string val)
            {
                var prefix = key + "=";
                var next = prefix + val;
                var i = lines.FindIndex(l => l.StartsWith(prefix, StringComparison.OrdinalIgnoreCase));
                if (i >= 0) lines[i] = next; else lines.Add(next);
            }

            Upsert("ENTERPRISE_ENV", valueRaw);
            Upsert("APISERVICE_IMAGE",   $"apiservice:{tag}");
            Upsert("WEBFRONTEND_IMAGE", $"webfrontend:{tag}");

            if (lines.Count == 0 || lines[^1] != "") lines.Add("");
            File.WriteAllLines(dotEnvPath, lines);
        }));
}

// After the pre-step, add your Docker Compose environment (publisher):
var docker = builder.AddDockerComposeEnvironment("docker-env");

// (Your services here, e.g.)
// var api  = builder.AddProject<Projects.ApiService>("apiservice").WithComputeEnvironment(docker);
// var web  = builder.AddProject<Projects.Web>("webfrontend").WithComputeEnvironment(docker);
What this achieves
- Interactive prompt (or CI-fed
ASPIRE_TARGET_ENV) chooses the ENV. - The choice feeds MSBuild via
ContainerImageTags, so generated container images are tagged (:dev/:staging/:prod). - The generated
.envis upserted withENTERPRISE_ENVand image variables you can reference indocker-compose.yml. - This runs before Docker’s built-in publisher writes Compose—so your values are ready when files are generated.
(The official docs describe these callbacks and the overall CLI behavior.)
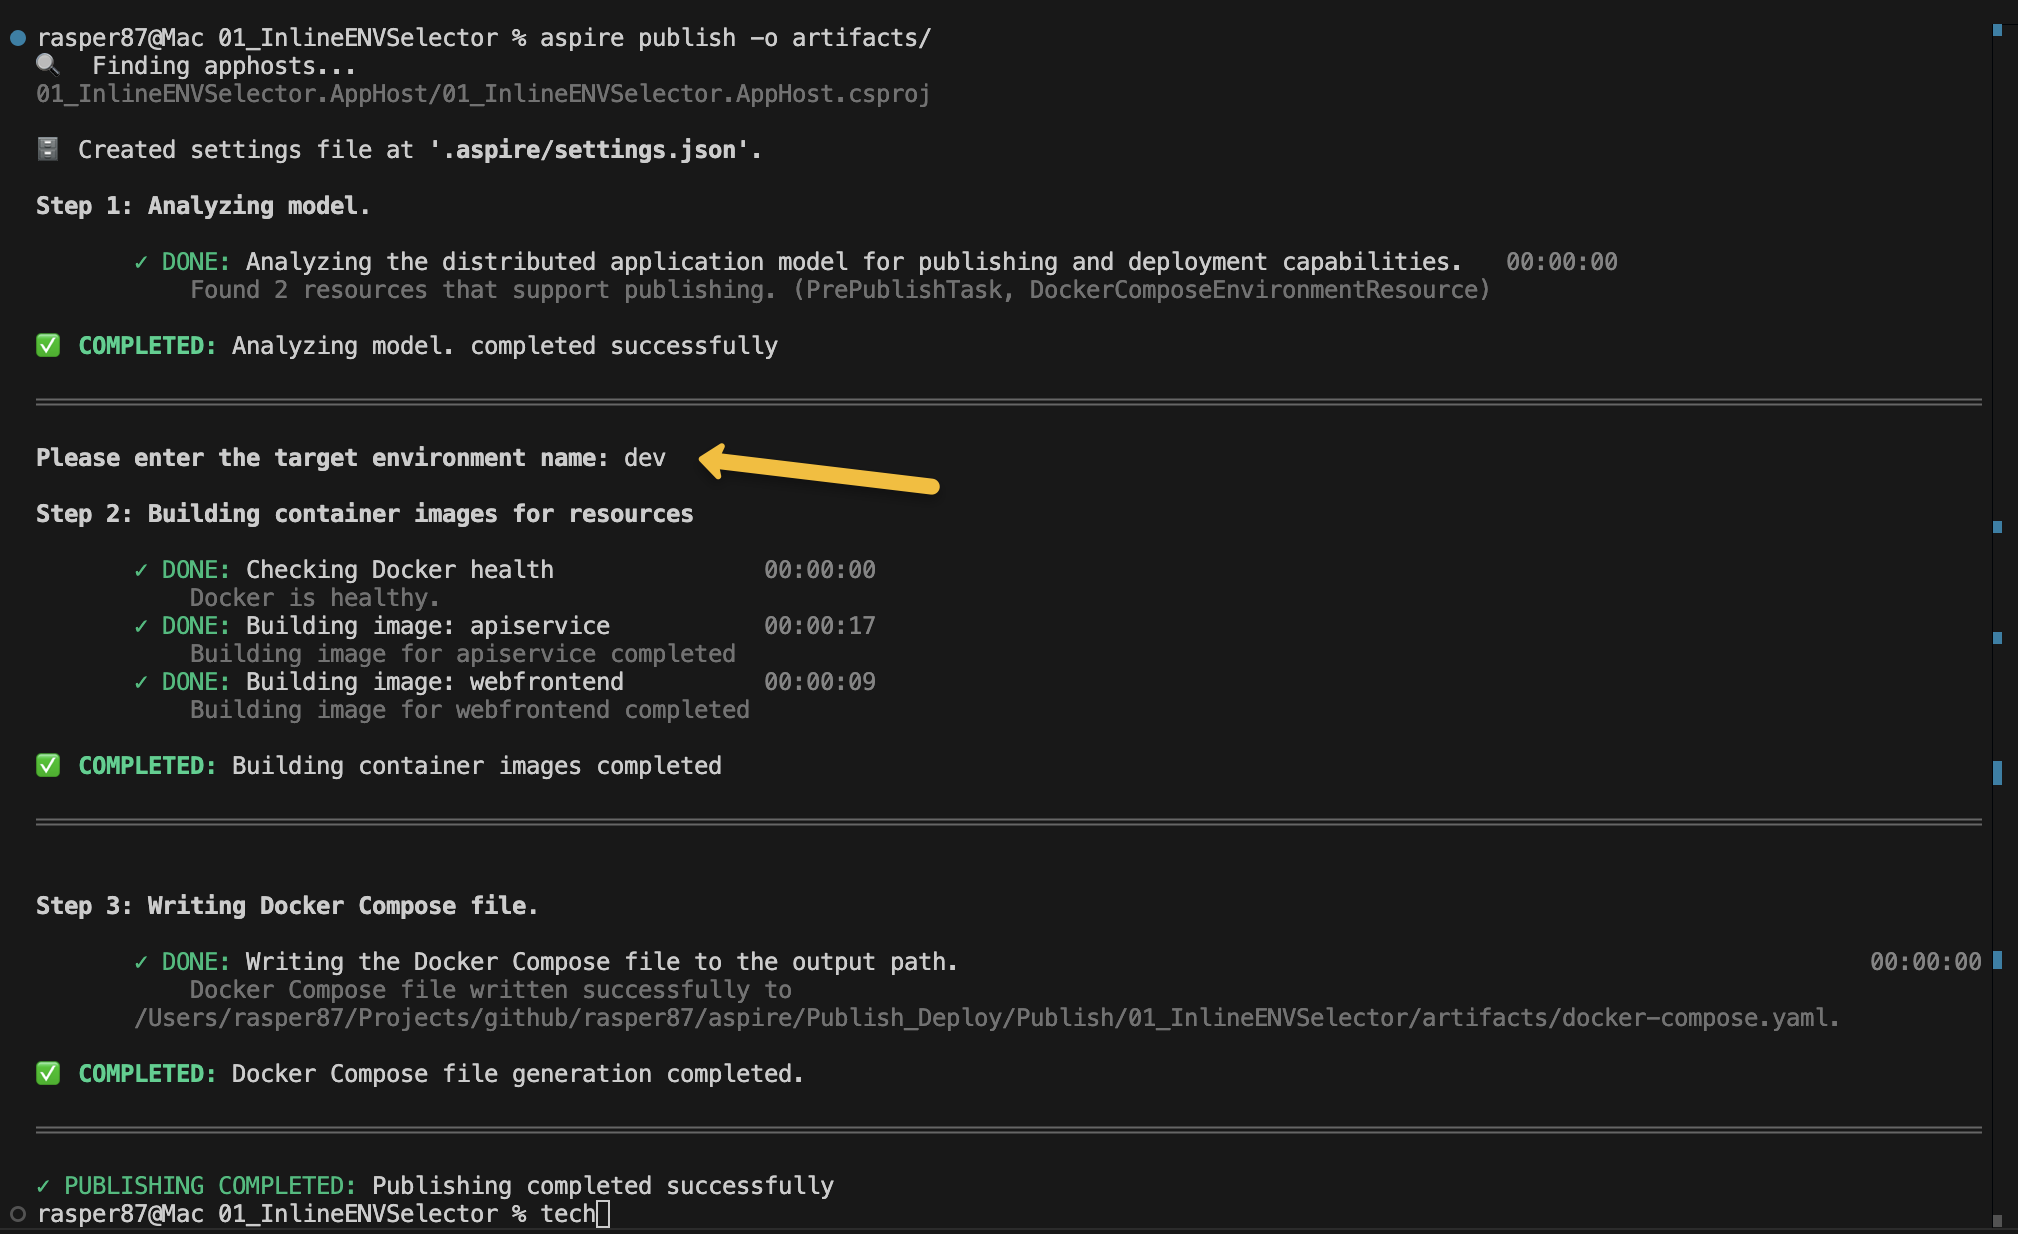
Running it
# Interactive publish (prompts for env)
aspire publish -o artifacts/

# Or set non-interactive in CI
ASPIRE_TARGET_ENV=staging aspire publish -o artifacts/

# Bring it up with Compose using your artifacts
docker compose -f artifacts/docker-compose.yml up --buildTip: In CI, prefer the non-interactive path: set ASPIRE_TARGET_ENV and let your pipeline cache/push images :dev|:staging|:prod to your registry, then docker compose on target hosts picks them up.
How this fits CI/CD
- Build:
aspire publishto generate images + artifacts. - Store: push images (
myrepo/apiservice:staging) and archive artifacts as build outputs. - Deploy:
- Docker: feed necessary vars (secrets, connection strings) and run
docker compose -f artifacts/docker-compose.yml up -d. - Kubernetes: same idea, but with K8s publisher outputs +
kubectl/GitOps. - Azure: consider
aspire deploy(preview) for ACA/App Service end-to-end.
- Docker: feed necessary vars (secrets, connection strings) and run
Gotchas & notes
- Multiple compute environments: if you add more than one (e.g., Docker + K8s), disambiguate per resource using
.WithComputeEnvironment(...)to avoid “ambiguous environment” errors during publish. Microsoft Learn - Placeholders are intentional: published artifacts keep
${VAR}style placeholders; resolve them during deploy (shell, CI, or supported deploy integration). Microsoft Learn - Preview: Publisher/deployer extensibility APIs and some Azure deploy experiences are in preview and may change. Keep an eye on the CLI docs for updates.
What’s next (follow-up posts I’ll write)
- Non-interactive CI mode with matrix builds (dev/staging/prod) + image push/pull policies.
- Kubernetes publisher outputs + Kustomize overlays per environment.
DeployingCallbackAnnotationto drive lightweight, scripted deploys (e.g., data seeders, pre-flight checks).
References
- Aspire publishing & deployment overview (official). Microsoft Learn
- Aspire CLI (publish/deploy command behavior & sequence). Microsoft Learn
- Resource annotations & extensibility (callbacks). Microsoft Learn
That’s all folks!
Cheers!
Gašper Rupnik
{End.}


Leave a comment